Showing posts with label projects. Show all posts

09 January 2012

vintage hanger display updated


remember the vintage hanger christmas card display? it finally got an update. once the christmas decorations were down, the hangers and bits of string were looking a bit sad, so i culled through my instagram and hipstamatic pictures and picked about 40 to be printed.


i used the postalpix app and the prints were delivered in no time. i have to admit, it felt pretty good to actually hold a physical print - i honestly cannot remember the last time i had pictures developed.


i love seeing my favorite memories around the house! i had just enough prints for two hanger displays, plus a few extra to tuck here and there around the house. i think this will be a rotating display that i update every few months - i already have a queue for my next print order. this could be dangerous.

i hope you're having a great monday! it's rainy and dreary here, so it's pretty darn perfect.

02 January 2012

goldmine attic find


happy 2012! i hope the year of the dragon is off to a great start for you. with cool people, yummy food, and good conversation to start the year yesterday, i certainly can't complain.

i also can't complain about the a m a z i n g atomic era gold shadow box that was discovered in the attic of my rental house. my friends (and landlords) are moving for a few years and are storing some things in my attic. yesterday, to everyone's surprise, they discovered this fantastic piece under a pile of insulation.

i (greedily, i'm afraid) called dibs and they (graciously) handed it over. the decorative edge is missing what we think was probably once a mirror, but other than that? it's in perfect shape. and i already have a plan involving glitter and resin to add a bit of awesome back to the shadow box. nothing tacky, i promise. stay tuned.

if this is a sign of the vintage goodness to come in 2012, i'm stoked.

oh! and to start off the new year, i started a facebook page for file me away. if you'd like to like it, well, that'd be swell!

31 December 2011

so long, 2011


i moved from a tiny, cramped apartment to a perfect (for me) little house that i love.


i listened to so much good music with really awesome people. there really needs to be more squares for this.


i had the best thrift store and estate sale adventures.


i had the best time laughing with my family and friends.


i tried more things. making is my favorite.


i snuggled with this cutie.


and i felt thankful for my amazing family.

i hope you had a spectacular 2011 - see you next year!

07 December 2011

vintage christmas card display tutorial


last year, right before christmas, i came across a 1950s stationer's stock of christmas card samples at an estate sale. i think i picked up just over 50 cards for around $5.00, which is a great deal considering how amazing the designs and colors are - i would have gladly paid more.

i wanted to display the cards around the house this year and i briefly considered a garland across the door; this idea was quickly nixed, however, as i've been a bit garland-mad of late (the holidays will do that to you). instead, i came up with a minimalistic display incorporating one of my favorite vintage accessories - wooden hangers!


to make a christmas card display, you'll need:
1. vintage wooden hangers.
2. a drill and drill bit. make sure the drill bit corresponds to the thickness of your string.
3. string/twine; scissors; miniature clothespins; a tape measure; a marker or pen.
4. your choice of christmas cards, new or old.


to make the display:
5. arrange your selection of cards to see how many you can get across the width of your hanger. i could get about three cards across without crowding them.
6. measure your hanger and mark off where you'd like your holes to be. my hanger measured almost 16" - i made marks at 2", 8" and 14".
7. drill holes where you've made your marks. safety first!
8. cut lengths of your string. hold your hanger up and determine how long you'd like your display to be - i cut each string at approximately 36".
9. secure the string on the hanger by knotting a loop through each hole.
10. use the miniature clothespins to secure your cards to the string. hang your display and enjoy!


it takes a little bit of a balancing act to get each side level and i played around a bit with the arrangement before i was happy with the dispersion of color and orientation (portrait vs. landscape). all-in-all, though, it was a super easy, fast and inexpensive project (i had all of the materials on hand).  


i ended up making two displays for different areas of the house. i love being able to see all the cards during the season and i think it would make a great postcard or snapshot display for the rest of the year.

how do you display your cards?

(note: here's the non-christmas version of the display!)

20 November 2011

have a seat... or two or three (a before & after)

oh, hai. it's been a (long) while since i last posted anything and i actually feel a bit shy. it's been a crazy two months around these parts - packing to move, moving, unpacking, adjusting, settling in. realizing that i'm completely happy and in love with the new place and neighborhood. especially when acquaintances in the neighborhood have a garage sale and i score three danish modern chairs for $15.00.


on first glance, not too shabby. but let's have a closer look, shall we?


broken arm and loose joints.


dried wood with plenty of dings and nicks.


tears. lots of holes here.


the vinyl's not in that great of shape, either.


the worst? unsightly stains.

over the course of two weekends, i tried to fix up these garage sale finds to bring back some of their former glory. i used teak oil, mineral spirits, oil soap, wood glue, new screws, new fabric, and lots of time at the sewing machine.


i recovered the two smaller chairs in a black-and-white patterned suiting material. one is by the tv stand/art deco buffet and the other is next to my record player desk table (with a few christmas things out).


i chose a vintage style chartreuse chenille/tweed fabric to reupholster the side chair. i've never attempted a box cushion with piping before, but i think it turned out pretty good! let's just not look too closely at the mismatched corners on the bottom cushion... ahem. 


the wood prettied up real nice with teak oil. i have to admit, the green fabric was a second choice (some credit due to keith), but it works so well against the dark frame - i really love it. sewing with this fabric, however, was something else all together. the bottom cushion has it's own name and it's not very nice.


i was feeling charitable with my sewing machine after the top cushion came together much more easily than the bottom, so i put together a quick throw pillow using piping scraps and the houndstooth fabric i originally chose for the smaller two chairs.

i'm feeling extremely thankful to be in a place where i can spread out, refinish, sew, and fix things again! it's been way too long. i promise not to be gone for long - i have a lot of posts lined up for december and a house tour should be around soon!

thanks for being patient while i settled in,

26 August 2011

chasing after deer // a tutorial

one of the first things i'm going to do in my new place is set up a display wall for my paint by number collection. i have a modest start to a nicely varied collection, but i wanted to add something witty, vibrant, and a bit modern.
i'm a huge fan of trey speegle's paint by number art (i seriously want this pillow) and i was completely inspired by elsie's tutorial a few weeks ago, so when i came across a blank PBN canvas on etsy, i placed my order without skipping a beat. the fact that the canvas came without its paint set or any listing of its original colors did not faze me. the seller kindly linked to the paint by number museum, where i could see a completed canvas for reference.
if you ever come across a blank PBN canvas and want to give this project a whirl, here's what i used:
- ruler
- paintbrushes (use brushes with very fine tips - there are approximately three gazillion small areas to mess up!)
- toothpicks (for filling in extremely small spaces and details)
- water to clean your brushes (not pictured)
- paper towels to blot your brushes (not pictured)
- graphite paper
- pencil (not pictured)
- printout of words/lyrics/quotes sized according to your canvas (not pictured)
- paint tray
- acrylic paint* (be prepared to spend a fair bit of time at the craft store picking out suitable colors if you do not have a color reference chart or picture. even with a picture to reference, it took almost an hour to choose and sort 22 colors in my mind and in my cart)

*i chose acrylic paint instead of oil or enamel (model) paint because it was much more affordable for the amount i needed. it does cover in a matte finish, which i actually prefer, but you can always use a coat of protective gloss finish at the end. also? it takes a few coats for a full coverage, so patience and time are key!
on a flat surface, place your graphite paper over the canvas where you'd like your words to go. place your printed words on top of the graphite paper and use a small piece of low tack tape to secure it in place. i used a ruler to center my words because i'm a bit obsessive, but if you can eyeball it, awesome. with your pencil, trace an outline of the words. you can lift up the corner of the paper and graphite paper to check for correct pressure and placement.
now you should have your words on the canvas! i should have used a sharper pencil as my outlines were a bit thick, but it works. now the fun part: start painting! be sure to have access to hours and hours of movie and tv marathon goodness. trust me.


(gah! please excuse the oddly-angled gif here. i'm a dunce and didn't realize it wouldn't rotate. durrr.)

i read up a bit on painting PBNs and a few tips i picked up were to start with either the lightest or darkest color and work to the opposite end of the spectrum. did i do this? uh, no, but it's a good thought in theory. also remember to lightly dip your brushes into the paint - you need very little paint with each stroke. a big glob results in a big blob (like what i did there?).
this is what the original finished piece would have looked like had i bought it completed or used the original colors.
and here's my finished custom paint by number. to say i'm in love would be an understatement.
i still have that post-project glow where all i want to do is stare my creation with all its foibles and imperfections. is this normal? it sounds terribly narcissistic. 
i seriously toyed with the idea of using a very fine-tip sharpie to outline the words for a bigger visual pop, but in the end, i kind of like that it takes a minute to register what's going on. it also helps that at the very end, i changed the color of what is now the lightest green. before, it was a khaki almost identical to the canvas color and the words were completely lost.
i almost forgot to share my inspiration for the words! i love, love, love midlake, especially their album the trials of van occupanther. the whole album is exceptional and it is definitely my go-to music for fall and winter. i could probably listen to all the songs on repeat, but one in particular will always be my favorite: chasing after deer.


perfect for this paint by number.


25 March 2011

d.i.y. tutorial // vintage-inspired candles


this tutorial is long overdue. i've wanted to try making candles with vintage glasses and vintage ceramic planters for months, ever since i saw this post at whorange and this post at design*sponge, and i finally got around to whipping a few up this past weekend.

excited? good.

first, gather all the materials you'll need.


a saucepan (or a double boiler if you've got one)


a heat-resistant glass bowl. i used a vintage pyrex bowl, but you could also go for something like...


this heat-resistant glass bowl. just make sure whatever you choose fits over your saucepan because you don't want the steam to escape. note: if you have a double boiler, you don't need either of these types of heat-resistant bowls - lucky you!


candle-making goodies! i used a 2 lb. hunk of creme candle wax and 9" wax-coated wire wicks. if you'd like your candles to smell great, add some scent! i got concentrated scent blocks (each is 1/2 oz.), but you can also find liquid scents. also (not pictured), if you'd like a color other than white, pick up some candle dye. i did a quick google search at the store because i had gel food coloring and thought that it might work; unfortunately, gel food coloring will not cut it for shading candles.


other assorted tools: a cutting board and sharp knife; a pair of scissors; a candy thermometer (you can do without this if you don't already own one); and double pointed knitting needles (or pencils or chopsticks).


candle containers. this is the fun bit! i went around my apartment and chose a variety of knick-knacks that have accumulated over months of thrifting, including spare melamine tea/coffee cups. 


i have a soft spot for vintage ceramic planters in the form of animals. i can't leave them behind at a thrift store or estate sale if i see them, but i do not have a green thumb in the least. a candle is the perfect answer and how sweet would these be as baby shower gifts?


i love vintage juice glasses! i try to pick them up whenever i see them and they rarely come in full sets, so this is the perfect way to showcase the oddball glasses in your collection.


and speaking of oddball glasses, i find that vintage cocktail glasses, even if they come in full sets, usually have one or two small flaws. put that slightly faded cup to use!

i got so fanatical about finding neat candle containers that everything i saw, i said (to keith because we were at an estate sale), "look! this could be a candle! a sugar bowl? it could be a candle! a pyrex mixing bowl? it could be a quadruple-wick candle!" it got to the point of put a bird on it (if you're not watching portlandia, uh, come on and do so). make it a candle and put a bird on it!


before you begin to heat anything, take that block of candle wax and chop it down with a sharp knife. if you've decided on a concentrated scent block, chop that up now (1/4 oz. per 1 lb. of candle wax), as well, and set aside for later.


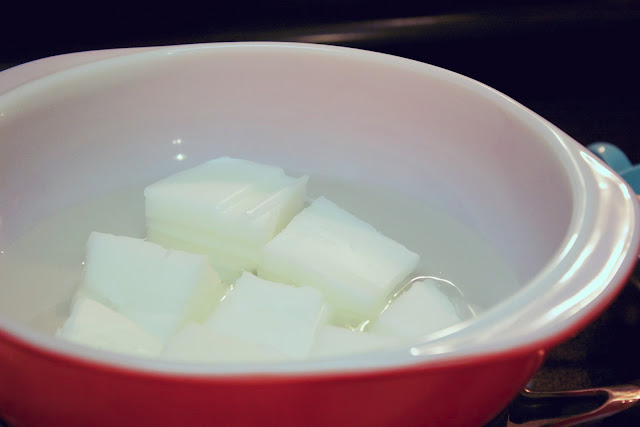
i cut my block into 16 squares, but i could (should) have gone smaller. you want uniform-sized chunks so everything melts evenly. having smaller blocks to work with means the wax will melt faster.


after your wax is cut down, prepare the wicks. hold the wick so the bottom silver cap is flat on the bottom of the candle container. place your double pointed needles (or pencils or chopsticks) across the opening of the vessel and gently wrap the wick around the needle, being careful not to move the silver cap too much. set aside, but not too far away - you'll want to pour your hot wax into these as soon as it's melted.


pour water into your saucepan and place your heat-resistant glass bowl over the top.


place you wax chunks into the heat-resistant bowl and, with the heat source on medium, begin to heat the water and wax. i decided to melt my wax in two batches, hence only eight blocks of wax.


then wait...


and wait...


and wait until the wax is almost completely melted.


i occasionally stuck my thermometer in to check the temperature. the wax should be completely melted at 180 degrees.

**if you are going to color your candles, add the dye right now, stirring until the color is uniform and you're pleased with the shade.** 

when everything has melted away, remove the wax from the heat and let it cool to 175 degrees (or just wait a minute or so).


when the wax has cooled a bit, add your reserved scent shavings. if you're making the candles in two batches like i did, only use half a block of scent at this point.


reserving approximately 3/4-1 cup of your melted wax, pour the wax into your awesome containers. if you need to adjust the wicks at this point, do so quickly as the wax starts to harden almost immediately.

**not pictured because i'm a dunce and forgot to take a picture: after about 30 minutes, poke holes in the still-soft wax near the wicks to let built-up air escape. fill the holes with the reserved wax, but don't go over the original fill line.**


when the wax has cooled completely (about 4-6 hours), remove the double pointed needles and clip the wicks to 1/4".


that's it! it was super simple and i think they turned out pretty cute! my 2 lb. hunk o' wax made five candles in various sizes.


enjoy your handiwork!


i love this little kitty.


you can spread the candles throughout the house or...


you can group them together in what appears to be some kind of weird vintage shrine. i vote for the former.